GD427 in action

GD427 in action

Thursday 28 June 2012

Heater hoses

Started on the heater hoses, this all seems like quite a tight fit, one reason is that the aluminium plates which fit under the dash have to go on last so all of the wiring and heater hoses have to be long enough to attach to the plates before they are pushed up into position.


Each hose, one for each side of the car, splits into two runs, one goes to the footwell and the other to the screen demist vent.


The splitter piece was made from a piece of plastic waste pipe, cut, stuck together and painted black.


Thursday 21 June 2012

IVA

The latest part to be completed is the application form for my IVA test. I've requested 11th July, just got to wait and see what date they come back with. I've still got a little more work to do but everything is falling into place and I've still got a few clear weekends to get everything sorted.

Monday 18 June 2012

Column shroud

I finished fitting the column shroud this evening. After cutting the holes in the aluminium earlier I stuck the leather on and cut out the clearance holes for the ignition barrel and indicator/wiper stalks.


There's a trick to making a neat job around the ignition barrel which involves removing it from the column by turning the key to position 1 and inserting a thin tool into a hole at the front.


This causes the barrel to pop out


You can then place the shroud over the column and cut the leather slightly smaller than the outside edge of the hole so that when you place the barrel back in it traps the leather.


Before refitting the barrel you have to push down on a small u shape part within the barrel until it clicks, then when you push the barrel back in it should click twice before it's back in position.


I followed these directions from other blog sites and found it all pretty straight forward. Those directions came with a warning which I feel is only fair to pass on... once the mechanism is removed from the barrel DO NOT TURN THE KEY AND DO NOT ROTATE THE STEERING COLUMN. Don't know why but I thought I'd heed the warning and not have to find out.

I also fitted the lever which controls the tilt mechanism to adjust for comfort. I used a punch to make a hole in the leather and then a small grommet to tidy it up. I've got some more stainless stalks which replace the plastic ones for the indicators and wiper but that's a job for another day.


All finished,

Sunday 17 June 2012

Electrics

Well I finally plucked up courage and connected the battery today. All circuits worked OK except for two which kept blowing fuses. A bit of detective work sorted the first, the sidelight bulb was damaged and where the terminals pushed into the holder it was creating a short. The second I've not solved yet. On accessory power i.e. first position on the ignition, if I put everything on i.e heater, wipers, washer, sidelights and fog light and then flash the headlights, the bulb blows. It isn't a problem on the second position just the first. It suggests the fuse for the accessory circuit isn't rated high enough but I want to be sure before I mess with it. Either that or refrain from sitting there with my lights on, in the fog, with the engine off, heater on, washing the windscreen with the wipers going and flashing my headlights at passers by.

I'll try and post some pictures later in the week but the other achievements were fitting the side repeaters, fitting the windscreen washer jet and the windscreen wipers and finally fitting the windscreen centre stay which was a bit fiddly and necessitated cutting down an Allen key to fit.

I also fitted the front floor carpets and started painting the underfloor strengthening plates for the seatbelt harnesses.

One setback I had today concerns the wiper motor. When I originally fitted it I checked the park position and decided it was correct, result ! The more I thought about it and looked at other cars made me decide it was wrong after all so I had to take it out again, take it all apart and move the small plastic "ramp" inside which dictates which side it parks on. This wasn't too difficult but I did have a little trouble getting it all back together. Anyway, turns out I was right the first time, if you look at a cobra you'll notice the wipers park on the opposite side to a normal car, well that's true for my car anyway. So I had to take it out again, only this time, the dash under trays, wiring looms and carpet have all been added which made it a little more tricky. In addition, it turned out I had slightly damaged the end of the wiper motor shaft when I refitted the circlip and I couldn't now get the shaft out of the casing. I ended up having to drift it out with a punch which also pulled the press fit bearings out ! So a simple job which was right the first time took me all afternoon to put right... again, including getting grease all over my lovely new carpet :-(

Tuesday 5 June 2012

Floor carpets pt 1.

I stole and hour or so in the garage today to finish glueing the piece of carpet to the rear bulkhead and to fit the rear floor carpets. These aren't glued in but held in place by nature of the harness eye bolts and seats runners bolting through them. I'd previously drilled the holes for the harness and seats and by placing the carpet in position and then carefully pulling it back and marking the hole edges with a piece of chalk I could lay the carpet back down and transfer the marks onto the rear. Removing the carpet from the car, I used a punch to cut out the holes. Here you can see it laid back in with bolts pushed through the holes to make sure it all lines up. This is the drivers side and you can see I still need to cut around the handbrake mount which I'll try and do tomorrow. The wire and connector you can see at the rear is for the heated seats.

Monday 4 June 2012

Under dash trays

I did a bit more work on the under dash trays and the multitude of wiring in this area. The ECU is mounted and I've cut the holes for and fitted the heater vents which direct hot air to the footwell. This all took a lot longer than I'd planned as I had to try several different positions in order to gain enough clearance behind the dash for the back of the instruments. I think I've got it sorted now and can begin to permanently fix the Mast wiring loom and the additional wiring I've put in for heated seats, 12v power outlet, neutral safety switch etc.


Another trial fit of the dash and somewhere to put it out of harms way. I couldn't finish the wiring for the dash loom and the modifications I'd made as I'd run out of a few bits and pieces and being bank holiday, it will be a few days before I can get them. Fingers crossed, the big switch on will be next weekend.

More carpet

Stuck a bit more carpet in today, I still need to finish along the bottom edge so have only stuck the top half at the moment. I've got cables running along the bottom and the carpet needs trimming around the area where the harness eye bolts go through the floor. I'll sort these areas out first and then stick the rest of the carpet down. There's only the floor mats to do now. The rear one is held in by the seat and the front one is held in with carpet fasteners.

Sunday 3 June 2012

Dash Finished

Well, the plan was to do a Dash Leather part 2, part 3 etc. but I just got carried away so we'll jump straight to Dash finished. After I'd temporarily fitted the gauges, I stuck the leather tabs down on the rear of the dash and cut out the holes for the warning lights and switches using a punch. I didn't have a punch of exactly the right size but I found that because the leather had some give in it and to a point was stretchy, I could use a punch a little smaller and gently ease the warning lights and switches through the slightly smaller hole.


It all went together relatively easy so it was onto the piping around the aperture for the steering column and then along the top edge. The piping looks a little odd in the pictures but I left it a little high along the top edge so that when the dash is in position it folds down nicely.


One area which gave me a little to think about was the lucas switches which came with either a round fixing ring or a hexagonal nut like fixing ring. I've seen other builds which had the rings all matching so I set off on a mission to find either more hexagonal nuts or round rings so they all looked the same. The solution was relatively straightforward in the end and I bought a couple of spare round fixing rings from SVC but at £5.50 each I was a little taken aback ! Anyway, it's done now and I'm glad I bit my lip and pressed ahead as it looks much better with them all being the same.


So onto my chosen layout, I've basically put all the gauges which I consider to be the most important along the right hand edge of the triangle so they're easier for the driver to see, oil pressure, water temperature and fuel.


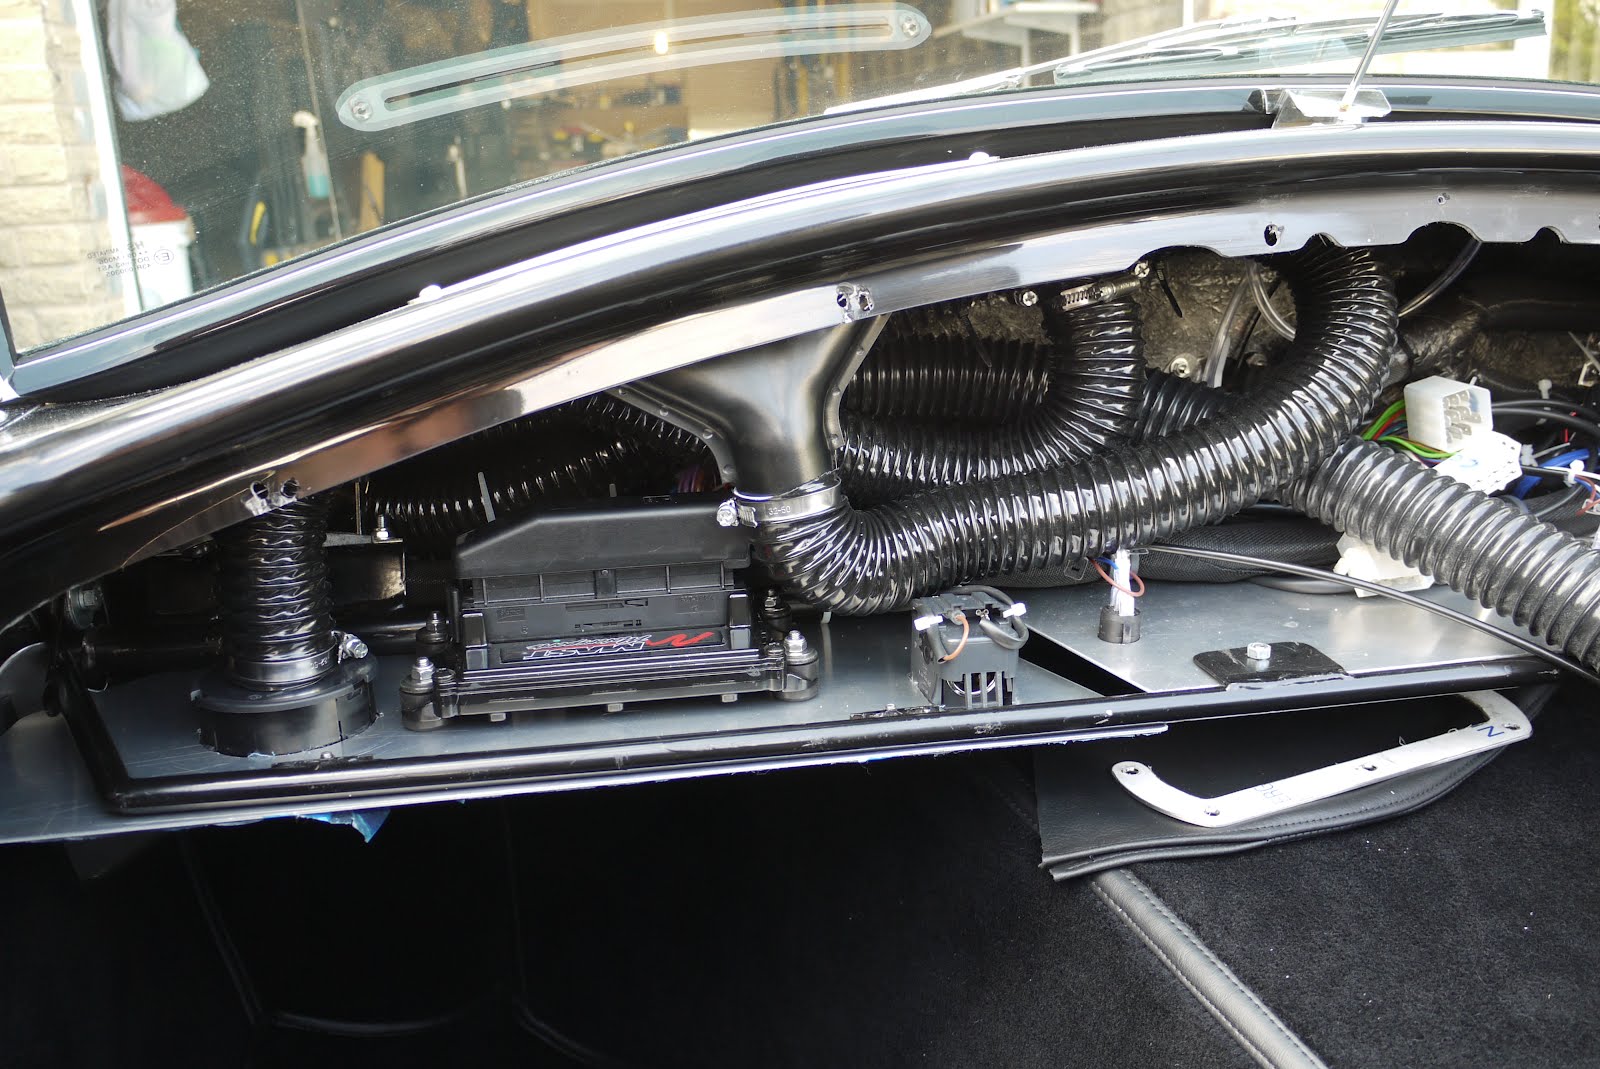
I hadn't stopped to think whether there was a standard layout for the gauges and found that when I fitted the dash loom on the rear some of the wires needed a little help to reach their intended position. With the integration of the standalone Mast wiring loom I'm using for the engine management, I had to make some slight alterations and put some extra wires in for ignition, rev counter, malfunction indicator light (MIL) and water temperature which I'm driving from the Mast ECU rather than a straightforward sender.
I also had to put an extra earth wire in for some modifications I've made to the windscreen wiper circuit which now has an intermittent wipe feature. It looks like a dogs dinner at the moment and I may try and tidy it up but I need to test it first so I'll wait to find out if it all works before I mess with it anymore. It is all very secure though and I've lost count of the number of zip ties I've used to hold it all in place.


In addition to the wiring, the loom also needs a voltage stabiliser fitted which regualtes the voltage down to 10v for some of the instruments which takes out inaccuracies caused by the fluctuating voltage of the main loom caused by the alternator cutting in and out as required to charge the battery. I bolted the regulator across the fixing brackets used to secure two of the small gauges.


Got a bit of work to do to the wiring in the car which connects into the dash loom and steering column switches, ignition, indicator stalks etc. then I should be in a position to connect it all together, connect the battery and give it a test.