GD427 in action

GD427 in action

Sunday, 26 September 2010

Lights

Spent this afternoon wiring up the front headlights and indicators. I've gone for the 4-way waterproof connectors from polevolt in common with others, which provide a really neat solution to connecting everything up but does involve cutting off the existing connections, cutting the wiring to length and crimping on your own spade terminals. What makes it particularly tricky is that most of it has to be done under the wheelarch working with relativley short lengthes of wire. I also took the opportunity to run all the cables through protective sheathing, sealing the ends with heat shrink. This is probably all overkill but it has made a very neat job and I quite enjoyed doing it !


I decided to secure the connectors with p-clips but had some trouble with the sizes. When tightened down, the P-clips (25mm) seemed a little tight and distorted the polevolt connectors, squashing them out of shape and negating the sealing properties and the benefits of them being waterproof. I think it's just a case of cutting the rubber band of the p-clip back a little but for now, they are temporarily mounted until I can sort something out.


I've also finished painting the isoflex liquid rubber under the arches. I've gone for two coats at the moment but may add another at a later date.

Monday, 6 September 2010

Just keep moving forward...

A few pictures just to show where I'm up to. there no major steps forward here, just small jobs being ticked off the list, but as the title suggests I'm trying to keep the momentum and keep moving forward.

Here you can see that both of the wiper spindles have been fitted


I've started to paint stonechip under the front arches and in common with a few other builds I've been following I've used Isoflex liquid rubber which is intended as a roofing product but leaves a rubberised coating which should cut down on the spider web type of cracking often caused by stones flying up under the arches from the tyres. This is after the second coat and as you can see is still drying. This has to be the least enjoyable part of the build so far and is arm acheing, sticky, smelly and new T-shirt ruining.... ! (The lights and indicators have been removed for this part of the build and will probably only go back on now once the body has been polished.)

I've also fitted the heater for the last time after buying silicon rubber hose to fit over the outlets. The two outlets are at right angles to each other meaning you need one straight hose for the outlet which exist horizontally and one with a 90 degree bend in it for the outlet which exists vertically. Rather than buy two, I bough one 90 bend hose with extra long legs and simply cut one leg short using the off cut as the straight section for the other. Both of these will need cutting to length so I've left them long for now.
You can also see the battery studs which extend from with the wheel arch cavity containing the heater through into the engine bay to provide convenient power take off.


Here you can see the relay block and fuse box mounted along with the hot air outlet for the heater and the windscreen support bar which extends across the cockpit behind the dashboard. It all gets a bit tight in this area so I'm glad to have that part out of the way. If you use the Vectra column, before mounting the relay block there is a small modification to the wiring required which I strongly recommend you carry out first.

The last photo shows the dashboard temporarily held in place prior to marking out for the guages

Sunday, 25 July 2010

Forward wiring loom started.

Little bit more progress this week. I fitted the side vent on the driver's side so that's both of them done now. I'm going to leave them wrapped in masking until I fit them for the last time. I still have to tidy the recess itself and spray it and the spacing tubes matt black.


I also bought some new polish/compound. Using a rotary polisher and Farecla Profile 200 with a wool pad I polished the bulkhead in the engine bay. This was followed by 500 on a lambswool pad and finally glaze on a polishing foam. Other than the odd shaped head I seem to have developed, I'm very pleased with the results.


With this area finished I could start to install the forward wiring loom. Just got a couple of "p" clips on to hold it in place, the rest will have to be left for another day.


Sunday, 11 July 2010

Bonnet Locks Finished

Quick update.. Cut the slots into the bulkhead to take the bonnet locks and repaired a few scratches with gelcoat. Still need to finish the edge in places but otherwise the bonnet is now finished and just needs polishing. I'm going to leave that for the time being and keep to my plan to trial fit all components and then take them all off again before polishing the body. Once that's finished, the parts can all go back on and be fitted permanently.

Everything seemed to take a long time today and I don't feel I've got much to show for it. One thing I have done this week is order the chassis. I'm also shopping for an engine and gearbox. When that lot arrives there should be some major advancement in a very short space of time. I've gone for the "Euro" option which comes as a rolling chassis with all the suspension components, hubs, drive shafts, diff etc already bolted in place . The plan will be to bolt engine, gearbox, exhaust and a few other bits onto the chassis and then drop the body straight on. I've still got a long list of jobs to finish before hand but I'm really quite excited !

Sunday, 4 July 2010

Bonnet Locks .....

... or how to fit a square peg in a round hole.
I used a 20mm hole saw to cut the holes in the bonnet for the locks to fit into


The lock itself is prevented from turning in the hole by have a square neck with rounded off corners. In order to mark out for the square section to be cut I placed the barrel in position and aligned strips of masking tape to the edge of the "flats" to transfer the square onto the bonnet.
I then used a small file to cut back the edges of the round hole to the edge of the masking tape to create the square hole.
Both locks fitted and the rest of the holes drilled and bolts fitted to the bonnet scoop.
Next job will be to cut the slots in the bulkhead which the bonnet locks slot into.

Sunday, 20 June 2010

Windscreen... second attempt

Spent Father's Day with my Dad, working on the car... doesn't get much better than that!
After my first attempt at rigging up some battens to assist with marking the holes on the screen support legs I went back to the drawing board and built something a little more substantial. This time it worked like a dream and made transferring the fixing holes to the legs childs play. The next part was not quite straighforward as we had terrible trouble drilling the legs themselves. I had thought this part would be relatively easy but despite having a good set of drill bits, a drill press and clamp, the bit was snatching in the material and making a right old mess. Luckily we had started with a small drill as a pilot and were gradually moving up in size so whilst it was a bit worrying and quite honestly frustrating, we hadn't done any damage. We had no option but to down tools and take some time out. Whilst having a cup of tea I turned to the internet and posted a quick message on the Cobra Club Forum asking for some guidance. Within a few moments we had our answer, we were using too slow a drill speed. My thanks to "Toddy" for putting me straight. Unfortunately Dad had to leave so he never got to see the progress I made once I upped the drill speed. Here's a few photos, partly to record my progress for the blog but also to show Dad what I got up to after he left.


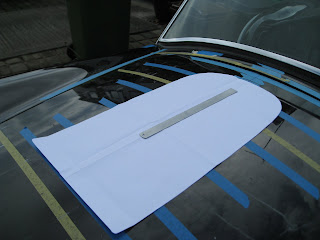
Having got the holes drilled in the windscreen support legs and got the screen mounted, my thoughts turned to the bonnet scoop. I had previously spent some time marking a centre line on the bonnet and after making a paper template of the scoop, cutting it out and folding in half, I aligned the centre of the template with the centre of the bonnet and marked it's outline onto the bonnet in preparation for the scoop itself.


Time was getting on by now and I wasn't going to get the scoop finished but partly to see what it looked like mounted and partly to keep it somewhere safe where it couldn't get damaged I drilled three of the mounting holes and bolted it on.

Sunday, 13 June 2010

The Windscreen Arrives...

Popped down to GD on Saturday morning to collect my windscreen and bonnet scoop. I wanted to fit the screen so I could get onto fitting the wipers but also so I could fit the windscreen support frame and then the other parts in this area such as forward wiring loom, relays etc.
One thing I hadn't given much thought was where to keep the screen until it was needed, I didn't really want to leave it in the garage, her indoors wasn't keen on it being left in the spare room and to be honest with two little'uns running around neither was I. The only solution left was to fit it ! :-)

I shamelessly copied Simon Rudmans method of making some spacers the same thickness as the frame legs and fixing battens in place to help locate the frame fixing holes and transfer them onto the frame legs. The spacers were made from penny washers wrapped in masking tape.


The battens made from some ply I had to hand and held in place with decorators caulk. Now this isn't the strongest of fixings but it would be very easy to get of and clean up afterwards. The idea here is that once the caulking was dry, I could remove the bolts and the spacers, slide the frame legs into place behind the battens and mark through the holes in the ply to transfer the fixing points onto the frame legs for drilling.


As with most holes the slots in the body were kindly marked by GD in the factory. I masked the area up, made some holes with a drill bit slightly smaller than the width of the slot and then opened it up with a file.


The frame legs were then fixed onto the screen, the whole assembly lowered into place with a support of 930mm used to prop the screen in place. Unfortunately this was as far as I got, partly due to rain stopping play but also becasue the decorators caulk I used the hold the battens in place wasn't as strong as I'd hoped and I knocked them off when passing the frame legs through the slots I'd cut. At least the screen can't (shouldn't) get damaged where it is but there it'll have to stay for now until I get time to attempt a better method for marking the fixing holes in the frame legs.


Couldn't help placing the scoop in place for the final photo