Quick update.. Cut the slots into the bulkhead to take the bonnet locks and repaired a few scratches with gelcoat. Still need to finish the edge in places but otherwise the bonnet is now finished and just needs polishing. I'm going to leave that for the time being and keep to my plan to trial fit all components and then take them all off again before polishing the body. Once that's finished, the parts can all go back on and be fitted permanently.
Everything seemed to take a long time today and I don't feel I've got much to show for it. One thing I have done this week is order the chassis. I'm also shopping for an engine and gearbox. When that lot arrives there should be some major advancement in a very short space of time. I've gone for the "Euro" option which comes as a rolling chassis with all the suspension components, hubs, drive shafts, diff etc already bolted in place . The plan will be to bolt engine, gearbox, exhaust and a few other bits onto the chassis and then drop the body straight on. I've still got a long list of jobs to finish before hand but I'm really quite excited !
GD427 in action

Sunday, 11 July 2010

Sunday, 4 July 2010
Bonnet Locks .....
... or how to fit a square peg in a round hole.

The lock itself is prevented from turning in the hole by have a square neck with rounded off corners. In order to mark out for the square section to be cut I placed the barrel in position and aligned strips of masking tape to the edge of the "flats" to transfer the square onto the bonnet.


I used a 20mm hole saw to cut the holes in the bonnet for the locks to fit into

The lock itself is prevented from turning in the hole by have a square neck with rounded off corners. In order to mark out for the square section to be cut I placed the barrel in position and aligned strips of masking tape to the edge of the "flats" to transfer the square onto the bonnet.

I then used a small file to cut back the edges of the round hole to the edge of the masking tape to create the square hole.

Both locks fitted and the rest of the holes drilled and bolts fitted to the bonnet scoop.

Next job will be to cut the slots in the bulkhead which the bonnet locks slot into.
Sunday, 20 June 2010
Windscreen... second attempt
Spent Father's Day with my Dad, working on the car... doesn't get much better than that!
After my first attempt at rigging up some battens to assist with marking the holes on the screen support legs I went back to the drawing board and built something a little more substantial. This time it worked like a dream and made transferring the fixing holes to the legs childs play. The next part was not quite straighforward as we had terrible trouble drilling the legs themselves. I had thought this part would be relatively easy but despite having a good set of drill bits, a drill press and clamp, the bit was snatching in the material and making a right old mess. Luckily we had started with a small drill as a pilot and were gradually moving up in size so whilst it was a bit worrying and quite honestly frustrating, we hadn't done any damage. We had no option but to down tools and take some time out. Whilst having a cup of tea I turned to the internet and posted a quick message on the Cobra Club Forum asking for some guidance. Within a few moments we had our answer, we were using too slow a drill speed. My thanks to "Toddy" for putting me straight. Unfortunately Dad had to leave so he never got to see the progress I made once I upped the drill speed. Here's a few photos, partly to record my progress for the blog but also to show Dad what I got up to after he left.

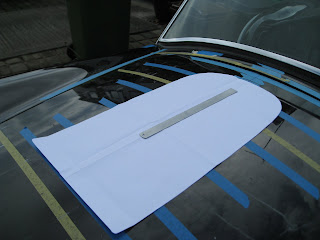
Having got the holes drilled in the windscreen support legs and got the screen mounted, my thoughts turned to the bonnet scoop. I had previously spent some time marking a centre line on the bonnet and after making a paper template of the scoop, cutting it out and folding in half, I aligned the centre of the template with the centre of the bonnet and marked it's outline onto the bonnet in preparation for the scoop itself.

After my first attempt at rigging up some battens to assist with marking the holes on the screen support legs I went back to the drawing board and built something a little more substantial. This time it worked like a dream and made transferring the fixing holes to the legs childs play. The next part was not quite straighforward as we had terrible trouble drilling the legs themselves. I had thought this part would be relatively easy but despite having a good set of drill bits, a drill press and clamp, the bit was snatching in the material and making a right old mess. Luckily we had started with a small drill as a pilot and were gradually moving up in size so whilst it was a bit worrying and quite honestly frustrating, we hadn't done any damage. We had no option but to down tools and take some time out. Whilst having a cup of tea I turned to the internet and posted a quick message on the Cobra Club Forum asking for some guidance. Within a few moments we had our answer, we were using too slow a drill speed. My thanks to "Toddy" for putting me straight. Unfortunately Dad had to leave so he never got to see the progress I made once I upped the drill speed. Here's a few photos, partly to record my progress for the blog but also to show Dad what I got up to after he left.

Having got the holes drilled in the windscreen support legs and got the screen mounted, my thoughts turned to the bonnet scoop. I had previously spent some time marking a centre line on the bonnet and after making a paper template of the scoop, cutting it out and folding in half, I aligned the centre of the template with the centre of the bonnet and marked it's outline onto the bonnet in preparation for the scoop itself.

Time was getting on by now and I wasn't going to get the scoop finished but partly to see what it looked like mounted and partly to keep it somewhere safe where it couldn't get damaged I drilled three of the mounting holes and bolted it on.

Sunday, 13 June 2010
The Windscreen Arrives...
Popped down to GD on Saturday morning to collect my windscreen and bonnet scoop. I wanted to fit the screen so I could get onto fitting the wipers but also so I could fit the windscreen support frame and then the other parts in this area such as forward wiring loom, relays etc.
One thing I hadn't given much thought was where to keep the screen until it was needed, I didn't really want to leave it in the garage, her indoors wasn't keen on it being left in the spare room and to be honest with two little'uns running around neither was I. The only solution left was to fit it ! :-)
I shamelessly copied Simon Rudmans method of making some spacers the same thickness as the frame legs and fixing battens in place to help locate the frame fixing holes and transfer them onto the frame legs. The spacers were made from penny washers wrapped in masking tape.

The battens made from some ply I had to hand and held in place with decorators caulk. Now this isn't the strongest of fixings but it would be very easy to get of and clean up afterwards. The idea here is that once the caulking was dry, I could remove the bolts and the spacers, slide the frame legs into place behind the battens and mark through the holes in the ply to transfer the fixing points onto the frame legs for drilling.

As with most holes the slots in the body were kindly marked by GD in the factory. I masked the area up, made some holes with a drill bit slightly smaller than the width of the slot and then opened it up with a file.


The frame legs were then fixed onto the screen, the whole assembly lowered into place with a support of 930mm used to prop the screen in place. Unfortunately this was as far as I got, partly due to rain stopping play but also becasue the decorators caulk I used the hold the battens in place wasn't as strong as I'd hoped and I knocked them off when passing the frame legs through the slots I'd cut. At least the screen can't (shouldn't) get damaged where it is but there it'll have to stay for now until I get time to attempt a better method for marking the fixing holes in the frame legs.

Couldn't help placing the scoop in place for the final photo

One thing I hadn't given much thought was where to keep the screen until it was needed, I didn't really want to leave it in the garage, her indoors wasn't keen on it being left in the spare room and to be honest with two little'uns running around neither was I. The only solution left was to fit it ! :-)
I shamelessly copied Simon Rudmans method of making some spacers the same thickness as the frame legs and fixing battens in place to help locate the frame fixing holes and transfer them onto the frame legs. The spacers were made from penny washers wrapped in masking tape.

The battens made from some ply I had to hand and held in place with decorators caulk. Now this isn't the strongest of fixings but it would be very easy to get of and clean up afterwards. The idea here is that once the caulking was dry, I could remove the bolts and the spacers, slide the frame legs into place behind the battens and mark through the holes in the ply to transfer the fixing points onto the frame legs for drilling.

As with most holes the slots in the body were kindly marked by GD in the factory. I masked the area up, made some holes with a drill bit slightly smaller than the width of the slot and then opened it up with a file.


The frame legs were then fixed onto the screen, the whole assembly lowered into place with a support of 930mm used to prop the screen in place. Unfortunately this was as far as I got, partly due to rain stopping play but also becasue the decorators caulk I used the hold the battens in place wasn't as strong as I'd hoped and I knocked them off when passing the frame legs through the slots I'd cut. At least the screen can't (shouldn't) get damaged where it is but there it'll have to stay for now until I get time to attempt a better method for marking the fixing holes in the frame legs.

Couldn't help placing the scoop in place for the final photo

Friday, 11 June 2010
Doors take 2
The first time I fitted the doors it was just really to make a start, since then they got in the way a few times and were taken off again. Many of the small jobs have now been completed and I've spent some time cleaning up the door edges and polishing the undersides ready for final fitting. There's still some work to be done but I thought I'd put them back on again and this time spend some time getting them lined up correctly. I've had to enlarge the holes in the back edge to adjust the position of the catch and open up the holes for the hinge arms but with a bit of fettling I've got this one at least fitting pretty well. It even bounces of the sprung catch when pushing it gently to !


Side Vents
I fitted the first of the side vents last night. The vent itself is stainless steel and is pictured here still covered in masking tape to prevent it getting scratched. It was slightly oversize for the recess and needed the corners reshaping slightly for it to sit comfortably inside. It is fixed with M3 x 30mm button heads that are self tapped into 2.5mm holes drilled in the body within the recess. In order to space the vent off the inside surface of the recess and control the depth that it sits inside, I've used some aluminium sleeve on the backside of the bolts as spacers which I bought from B&Q. I cut them to 18mm which seems to be about right. Before the vent is fitted for the last time I'll spray the spacers and the recess matt black.


Sunday, 30 May 2010
Tidying up a few edges
No pictures, just a quick description of what I've been up to other than trampolining.
Most of the components fitted to the body are trial fitted but I'm getting towards the stage where I'm happy with the fit and they can be permantly bolted into place. Thoughts have turned towards polishing the body and making good any and areas which might require a little attention. This week I've been concentrating on the bonnet and going all around the edge, rubbing down, filling with gelcoat and rubbing again to get a nice clean finish. Once that's done, there's some work to do on the edge of the boot lid and along the top of the doors. Most things have now been fitted at one stage or another, the only major part left to tackle is the windscreen which I've yet to purchase and is the next part of the jigsaw allowing the wipers/wiper motor to be fitted. I'll probably trial fit like most of the other stuff to make sure I'm happy and then it's an all over body polish and this stuff can all be bolted back on for the last time.
Most of the components fitted to the body are trial fitted but I'm getting towards the stage where I'm happy with the fit and they can be permantly bolted into place. Thoughts have turned towards polishing the body and making good any and areas which might require a little attention. This week I've been concentrating on the bonnet and going all around the edge, rubbing down, filling with gelcoat and rubbing again to get a nice clean finish. Once that's done, there's some work to do on the edge of the boot lid and along the top of the doors. Most things have now been fitted at one stage or another, the only major part left to tackle is the windscreen which I've yet to purchase and is the next part of the jigsaw allowing the wipers/wiper motor to be fitted. I'll probably trial fit like most of the other stuff to make sure I'm happy and then it's an all over body polish and this stuff can all be bolted back on for the last time.
Subscribe to:
Posts (Atom)