
GD427 in action

Showing posts with label Scoop. Show all posts
Showing posts with label Scoop. Show all posts
Sunday, 8 April 2012
Bonnet locks & scoop bolts
Finished today by refitting the bonnet locks and the stainless button heads which hold the hood scoop on. The number of bolts is obviously just for show and replicates the rivet pattern found on the aluminium panels of the original cars from the sixties.


Sunday, 1 April 2012
Scoop
I'd temporarily fitted the scoop before but this time it's for keeps. Because the engine I'm using doesn't need airflow to the top of the engine as the intake is located in the nose, the scoop is purely for looks. Rather than cut out the front of the scoop unnecessarily, I've painted it matt black and covered it with stainless mesh. The mesh was cut to shape and left a little long so it tucked under the bottom front edge and could be secured behind. Hopefully the pictures will make it clear. Around the top, the mesh is held in place by tucking into a piece of rubber channel which I glued into place with araldite.

Once the glue had dried, I fitted the top edge of the wire mesh into the channel and used polyurethane adhesive, tiger seal, to stick the mesh which overlapped and tucked under the front of the scoop onto the rear of the scoop face. The scoop then bolts to the bonnet with some stainless M4 button heads.


Once the glue had dried, I fitted the top edge of the wire mesh into the channel and used polyurethane adhesive, tiger seal, to stick the mesh which overlapped and tucked under the front of the scoop onto the rear of the scoop face. The scoop then bolts to the bonnet with some stainless M4 button heads.

Sunday, 31 July 2011
A few more bits and pieces
Finished off a few more bits this weekend. First off I finished fitting all the body mounts bolts ensuring they weren't too long and rubbing on the chassis. Where the tolerance was a little close I just used another washer to space the end of the bolt away from the chassis. I also trial fitted the stainless mesh in the front of the hood scoop. Becasue of the style of engine I'm using, the scoop itself is just for aesthetics and serves no purpose other than looking great ! I haven't cut the front out of the scoop but instead painted it matt black and then fitted the mesh across the front to match the oil cooler and brake ducts.

At long last I fitted the drivers door, this always caused me a few problems in the past as I couldn't quite get the top bolt through the hinge plate, I must be on a roll as this time I tried it went together almost straight away. I also had a little trail run with the polishing machine which is why this door looks a little shinier than the rest of the car.

Lastly I trial fitted ( a lot of stuff's trial fitted :-) ) some stainless steel rings I had made up by a friend from the owners club. Thanks Steve! The top ring will be used to trap a large rubber boot/gaiter I'm going to use to cover the main engine loom as it passes from the engine bay through the bulkhead to the rear of the dash. I'll probably rig up something similar for the smaller hole which is used for things such as the oil pressure line and washer bottle hose. The rings were made in identical pairs and each have another behind the bulkhead sandwiching the bulkhead between them. I may just use some 1mm rubber sheet sandwiched between the rings with a small hole cut in the middle for the wires to pass through. A little trial and error is needed to determine what works best.


At long last I fitted the drivers door, this always caused me a few problems in the past as I couldn't quite get the top bolt through the hinge plate, I must be on a roll as this time I tried it went together almost straight away. I also had a little trail run with the polishing machine which is why this door looks a little shinier than the rest of the car.

Lastly I trial fitted ( a lot of stuff's trial fitted :-) ) some stainless steel rings I had made up by a friend from the owners club. Thanks Steve! The top ring will be used to trap a large rubber boot/gaiter I'm going to use to cover the main engine loom as it passes from the engine bay through the bulkhead to the rear of the dash. I'll probably rig up something similar for the smaller hole which is used for things such as the oil pressure line and washer bottle hose. The rings were made in identical pairs and each have another behind the bulkhead sandwiching the bulkhead between them. I may just use some 1mm rubber sheet sandwiched between the rings with a small hole cut in the middle for the wires to pass through. A little trial and error is needed to determine what works best.

Sunday, 4 July 2010
Bonnet Locks .....
... or how to fit a square peg in a round hole.

The lock itself is prevented from turning in the hole by have a square neck with rounded off corners. In order to mark out for the square section to be cut I placed the barrel in position and aligned strips of masking tape to the edge of the "flats" to transfer the square onto the bonnet.


I used a 20mm hole saw to cut the holes in the bonnet for the locks to fit into

The lock itself is prevented from turning in the hole by have a square neck with rounded off corners. In order to mark out for the square section to be cut I placed the barrel in position and aligned strips of masking tape to the edge of the "flats" to transfer the square onto the bonnet.

I then used a small file to cut back the edges of the round hole to the edge of the masking tape to create the square hole.

Both locks fitted and the rest of the holes drilled and bolts fitted to the bonnet scoop.

Next job will be to cut the slots in the bulkhead which the bonnet locks slot into.
Sunday, 20 June 2010
Windscreen... second attempt
Spent Father's Day with my Dad, working on the car... doesn't get much better than that!
After my first attempt at rigging up some battens to assist with marking the holes on the screen support legs I went back to the drawing board and built something a little more substantial. This time it worked like a dream and made transferring the fixing holes to the legs childs play. The next part was not quite straighforward as we had terrible trouble drilling the legs themselves. I had thought this part would be relatively easy but despite having a good set of drill bits, a drill press and clamp, the bit was snatching in the material and making a right old mess. Luckily we had started with a small drill as a pilot and were gradually moving up in size so whilst it was a bit worrying and quite honestly frustrating, we hadn't done any damage. We had no option but to down tools and take some time out. Whilst having a cup of tea I turned to the internet and posted a quick message on the Cobra Club Forum asking for some guidance. Within a few moments we had our answer, we were using too slow a drill speed. My thanks to "Toddy" for putting me straight. Unfortunately Dad had to leave so he never got to see the progress I made once I upped the drill speed. Here's a few photos, partly to record my progress for the blog but also to show Dad what I got up to after he left.

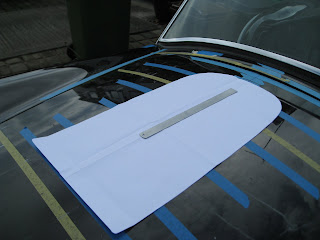
Having got the holes drilled in the windscreen support legs and got the screen mounted, my thoughts turned to the bonnet scoop. I had previously spent some time marking a centre line on the bonnet and after making a paper template of the scoop, cutting it out and folding in half, I aligned the centre of the template with the centre of the bonnet and marked it's outline onto the bonnet in preparation for the scoop itself.

After my first attempt at rigging up some battens to assist with marking the holes on the screen support legs I went back to the drawing board and built something a little more substantial. This time it worked like a dream and made transferring the fixing holes to the legs childs play. The next part was not quite straighforward as we had terrible trouble drilling the legs themselves. I had thought this part would be relatively easy but despite having a good set of drill bits, a drill press and clamp, the bit was snatching in the material and making a right old mess. Luckily we had started with a small drill as a pilot and were gradually moving up in size so whilst it was a bit worrying and quite honestly frustrating, we hadn't done any damage. We had no option but to down tools and take some time out. Whilst having a cup of tea I turned to the internet and posted a quick message on the Cobra Club Forum asking for some guidance. Within a few moments we had our answer, we were using too slow a drill speed. My thanks to "Toddy" for putting me straight. Unfortunately Dad had to leave so he never got to see the progress I made once I upped the drill speed. Here's a few photos, partly to record my progress for the blog but also to show Dad what I got up to after he left.

Having got the holes drilled in the windscreen support legs and got the screen mounted, my thoughts turned to the bonnet scoop. I had previously spent some time marking a centre line on the bonnet and after making a paper template of the scoop, cutting it out and folding in half, I aligned the centre of the template with the centre of the bonnet and marked it's outline onto the bonnet in preparation for the scoop itself.

Time was getting on by now and I wasn't going to get the scoop finished but partly to see what it looked like mounted and partly to keep it somewhere safe where it couldn't get damaged I drilled three of the mounting holes and bolted it on.

Subscribe to:
Posts (Atom)