GD427 in action

GD427 in action
Showing posts with label Roll Bars. Show all posts

Sunday, 1 July 2012

Seats in

Kinda lost my way over the past couple of days, been running around doing little bits here and there, finishing off the odd job where I'd used a standard nut but meant to use a nyloc, tidying some of the cable runs, trimming the ends off cable ties ect. and thinking about the IVA.

In terms of milestones, I've fitted the harness eye bolts after painting the load spreading plates black which go under the floor. I also fitted the eyebolts into the roll bars. As the roll bar contains a captive nut in the form of a threaded sleeve, in order for the eyebolt to tighten into the correct position you have to add or remove washers so it's vertical when fully tightened.


I fitted the handbrake gaitor, the one supplied is made from thick stainless steel and I wasn't sure how it fitted, it appeared that it had to be bent to follow the contour of the floor in this area and rather than risk making a mess of it, I made a copy in aluminium as a trial. The ally one fitted perfectly and as you can't even see it when the seat is fitted I'll leave in place for now. If the seats ever have to come out again, I'll fit the stainless one.


Once the harnesses were in I couldn't resist trial fitting a seat.


And once you've started, well, it would be rude not too !


Only the door cards and gearstick to go and the interior will be finished.

Saturday, 24 March 2012

Roll Bar Rubbers

I'd recently taken the roll bars off in order to polish the rear deck so when I put them back I took the opportunity to fit some rubber "doughnuts" to seal the gap between the roll bars and where they pass through the boot floor before being bolted to the chassis.


That's the last update for today although just before coming in from the garage I re-fitted the windscreen so I might post some more pictures tomorrow. I feel like I'm at a bit of a turning point in this build, I've taken my time, thought things through and really enjoyed what I've done but I'm also getting a bit restless and want to see this thing on the road. I'm finding that I'm pushing on without getting too hung up on the fine detail which because I can be a picky bugger just seems add hours, weeks and months to the build. Hopefully some more action tomorrow but having spent most of today "playing" I've got a few brownie points to earn with "err indoors".

Watch this space !

Monday, 12 March 2012

Exhaust

Spent some time over the weekend doing a little compounding and polishing on the rear deck and boot lid and fitting the rear cherry bombs to the exhaust. The polishing was in preparation for fitting the roll bars for the last time. After all the experimenting I've done with different compounds, polishes and pads my final weapons of choice are:

  • 2000 grit wet and dry by hand
  • Farecla G3 liquid on an Farecla Advanced G-Mop compounding foam by rotary polisher
  • 3M Ultrafina SE on a 3M perfect-it 3 high gloss polishing pad by rotary polisher

I'm getting pretty confident with the polishing now so will probably press ahead and get it looking respectable and on the road and worry about some of the fine detail later otherwise I could spend forever getting it all perfect. It's all going to get scratched and chipped once it's on the road anyway.

Starting to come together now ... !


Sunday, 18 September 2011

Roll Bars Revisited

After the dust had settled I went back and had another look at the roll bars. In fairness, the holes weren't too far out but they did need a little bit of work. I've narrowed the problems I had down to two reasons.

1. The first set of bars fitted fine but for the second, it wasn't obvious which way the holes needed enlarging when they wouldn't initially fit. They appeared to be tight against the bodywork but in reality there were simply leaning forwards because of the third leg hanging into the cockpit. If I'd had the chassis level I could have checked the vertical.
2. I hadn't taken account of the flex required in the third leg, I allowed for the main legs but cut the rear hole to fit the bars in their unflexed state. Once flexed to fit the mounting points, the hole had been enlarged in the wrong direction.

I didn't take pictures of every step in the repair but with the few I have and a desription, hopefully you'll be able to follow what I did.
The first thing I did was to tape a piece of 1mm rubber mat around the roll bar where it passed through the body. I then cut a curve into a square of grp matting and glassed it in on the underside of the rear deck, up to the rubber mat wrapped around the roll bar. The rubber mat was to protect the roll bar and once removed, to give me some clearance to remove the roll bar afterwards.


When it had set, I filled the gap I'd created with Isopon p40 filler and then when that had set, removed the rubber mat and then the roll bar itself leaving a new fillet of grp filling the space which I had previously over enlarged.


Now because I had filled up to the roll bar itself, the repair was too much and needed cutting back to give the required clearance of 5mm all the way round.
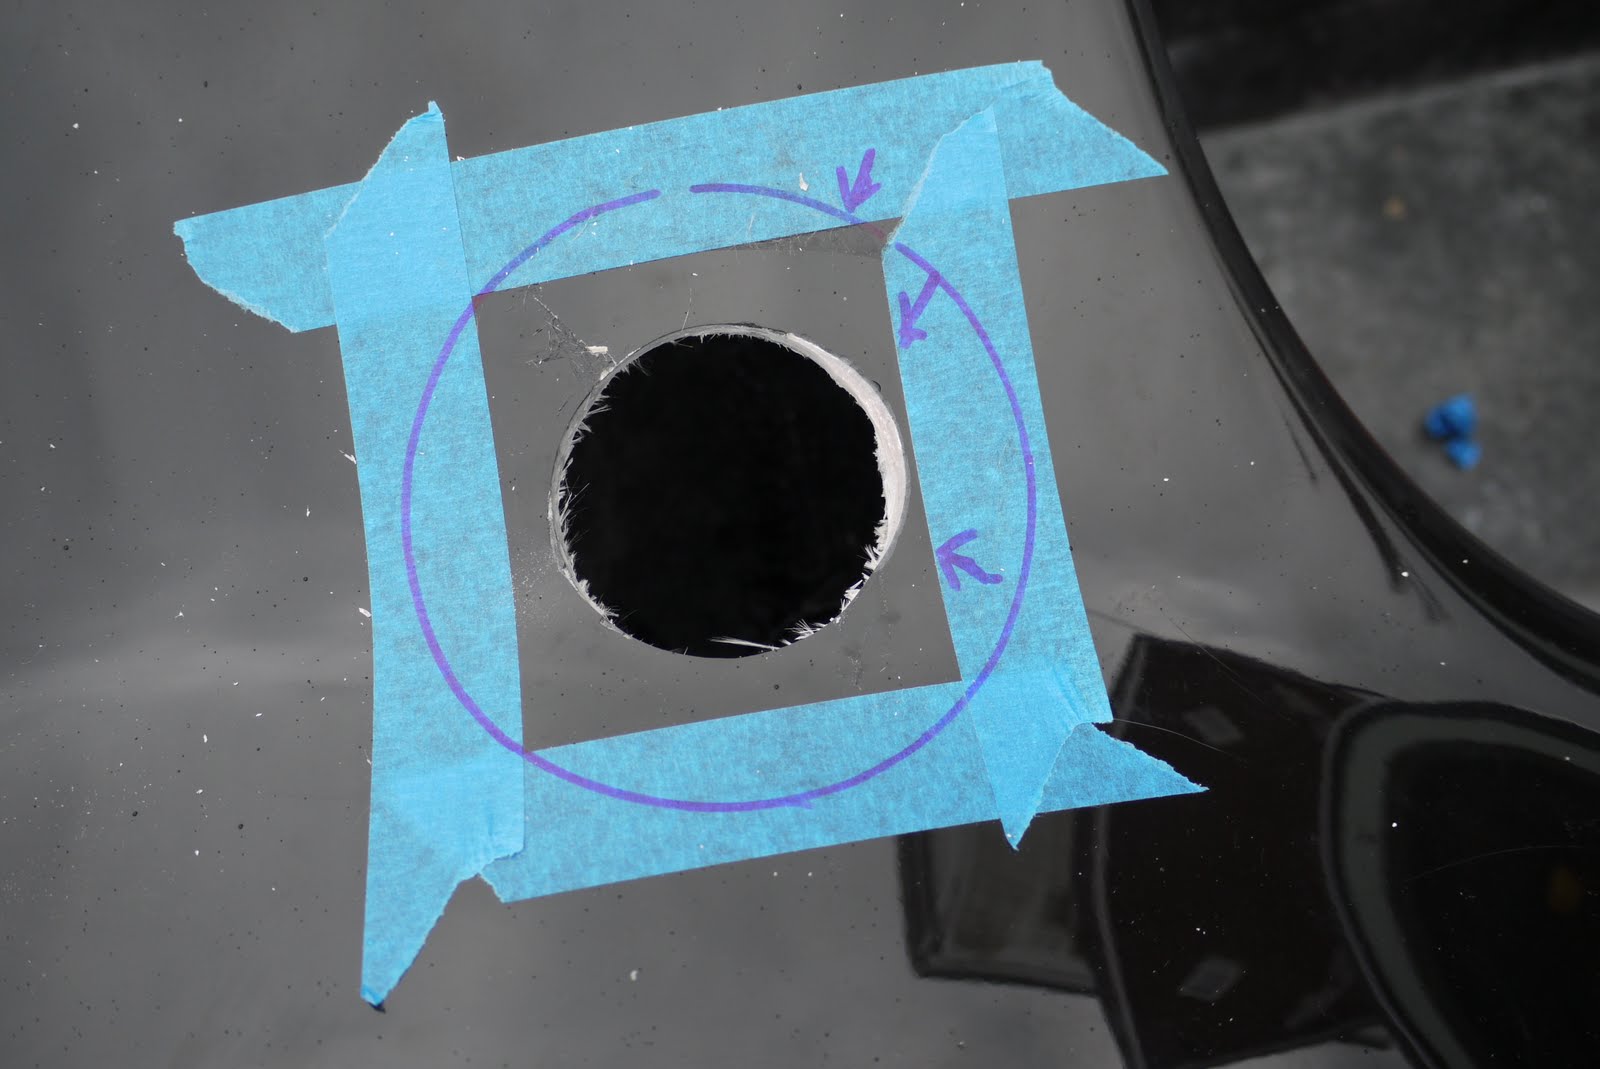
Prior to making this repair I had cut two doughnuts out of a 1mm rubber sheet, both with the same outside diameter but one which had the same inside diameter as the roll bar and the second with the diameter that the hole needed to be, including the 5mm clearance. With the roll bar in position I placed the first doughnut around the roll bar and marked the outside circumference. With the roll bar removed, I placed the second doughnut into position, carefully lining up the outside circumference with the marks made for the previous doughnut. I now had a reference point to enlarge the hole, along with the repair, to give the neccessary clearance.


Once the hole had been enlarged to match the inside circumference of the second doughnut, the filler was also cut back on it's surface ready for gel coat to be applied.


Once the gel had gone off, it was rubbed down level to the bodywork and repolished before the roll bars were refitted to see if it had all been a success...


There may still be a little fettling required but it looks good to me and with the grommet fitted, nobody would ever know...!


A couple of gratuitous shots to show how it's looking.


Thursday, 11 August 2011

Roll Bars part 3

Yes they're fitted, yes it was hard work and yes I made a hash of it !


I'm probably being a bit hard on myself but I don't feel this part of the build has been my finest moment. I basically followed the method shown on both Steve and Simon's site but just didn't make a very good job of it. Rather than simply rehash someone else's guide, I'll tell you where I went wrong and the pitfalls I found.

I chose to simply raise the rear of the car rather than all four corners. I believed that bolting the 12mm rod tightly into the chassis mounts would be enough to ensure it was perpendicular i.e. vertical in comparison with the chassis. Maybe it was, the problem is that I had no way of checking as I knew the car wasn't level so I couldn't use a spirit level to check. My advice, at least get all four corners off the ground even if you not sure the ground is level, it shouldn't be far out and a spirit level on the rods will give you a fair indication if they vertical.

When the roll bars are reversed with the third leg hanging into the cockpit, the weight of the third leg pulls the bars forward so when trying to bolt the first two legs in and your having trouble, it appears that you need to create more clearance at the front i.e. the direction the bars are naturally leaning toward. This is exagerated if you only jack up the rear of the car!

The bars (well mine at least) were slightly sprung and needed pulling apart to get the mounting holes lined up with the holes in the chassis. I'd worked this out for the main legs and made a wooden brace to fit between them inside the boot which held them apart at the right distance. I kinda overlooked this with the rear leg which caused me some problems. I took great care to open out the holes in the bodywork for the legs to fit though only to find than when flexed outward to fit the chassis mounts I'd enlarged the holes in the wrong direction. Yup, I did this twice !

The roll bars are now fitted temporarily but firmly bolted in place so I know they're in the right position. I still need to open a few of the holes out a little to create a 5mm gap around the legs for the grommets to fit but several of the holes will also need a little repair work. Fortunately, depending on your point of view, I've been here before and already have the materials I need !

This is the best, you can see where I've scored the 5mm clearance still to be opened out


And the worst, big enough to get my finger in !

Friday, 5 August 2011

Roll Bars part 2.

Well here's part two. I opened the holes out in the boot floor just enough to pass two lengths of 12mm threaded rod (the securing bolts are approx 12mm, half inch I think, hence the use of 12mm rod) though the roll bar fixings. The rods had been cut to length and long enough to reach the underside of the rear deck. I used a brace between the two to make sure they stayed parallel to each other and used a nut top and bottom of the roll bar fixing points to secure the rods in place.


I used the ends of the rods as a reference point to mark the underside before removing the rods and drilling though.


With the rods placed back into position I opened the hole out to reveal the ends of the threaded rod where I'd previously drilled a 6mm pilot hole to act as a guide for the pilot drill on the hole saw.


After a quick double check to ensure the rods were straight and hadn't been pulled out of alignment I set about drilling a 51mm hole through the rear deck. I decided to use a holesaw the same size as the leg and open it out as required rather than drill a bigger hole to start with. Whilst the final hole will be 61mm giving 5mm clearance all the way round, I erred on the side of inconvenience and a bit of fettling to get the legs to fit rather than run the risk of an error by trying to drill it to the correct size in one operation.


Once the two holes had been drilled I was able to place the roll bars into position albeit with the third leg pointing forwards awaiting the third hole to be drilled. Apologies for the poor pictures, I wasn't sure what the weather was going to do so I had to carry this out in the garage.


The whole process was repeated for the other side and I have to say it all went rather smoothly.


Unfortunately I haven't been able to complete the fitting as I don't have a holesaw of the correct size to cut the clearance holes in the boot floor for the main legs. I realise this isn't seen and I could've just cut something out using the Dremel but there's no rush. For this reason the roll bars are sitting a little high in the photos. Once the holes in the floor have been cut I can mount the main legs with the third leg pointing forward (as in the pictures) and use a template to cut the hole in the rear deck for the third leg. I have thought about using a similar method with the threaded rod to mark the third hole and may decide to take a different approach.

Monday, 1 August 2011

Roll Bars part 1.

Part 1 !! I’m not sure how many parts this will end up in as I haven't been looking forward to this bit, and keep putting it off.

The main issue is that the mounting points for the roll bar legs are now beneath the floor of the boot. Add to that, externally there is little to reference on the rear deck to mark where the roll bars should come through the body. The only way to calculate where to cut the holes in the rear deck is to transfer the reference holes from where they bolt onto the chassis up through the floor of the boot and then continue up onto the underside of the rear deck before cutting holes for the roll bars legs to fit through which have to be no more than 5mm out of alignment. I'm going to largely follow the method used by Simon and Steve on their sites, there's a few bits I haven't quite got my head round yet but in thinking it through have come up with my own solution.

First off, I cut down some 12mm studding long enough to bolt through the roll bar mounting points and reach up to the underside of the boot floor. I then drilled a 6mm hole into the end of each piece of studding before bolting them into place. With some rough measurements taken from underneath I guesstimated the position of the studding in relation to the inside of the boot floor and drilled some small exploratory pilot holes, using each as a reference from underneath until I had located the approximate centre of the studding and then opened this hole out with a Dremel to just a little larger than 12mm.

The plan is now to use a hole saw from within the boot, using the 6mm hole drilled in the centre of the studding as a guide for the pilot drill, and drill the clearance holes through the boot floor for the lower half of the roll bar legs. All of the exploratory holes I drilled were within the diameter of the hole saw and were through material to be removed anyway. A picture would probably help…


Here you can just see the guide hole drilled into the end of the piece of studding beneath the floor


Ahh, foiled, my new handy dandy right angled drill attachment wasn't big enough to take the holesaw arbour so I had to compromise with a ratchet and socket.


One down, five more to go. I need to buy some new holesaws as I don't have the sizes I need so I'll probably have to wait until the weekend to make any more progress.